


Article from: Unsealed 4X4
Shopping for an advanced dual battery system for your 4WD? We take a look at the CTEK 140A Off-Road to see if it’s for you
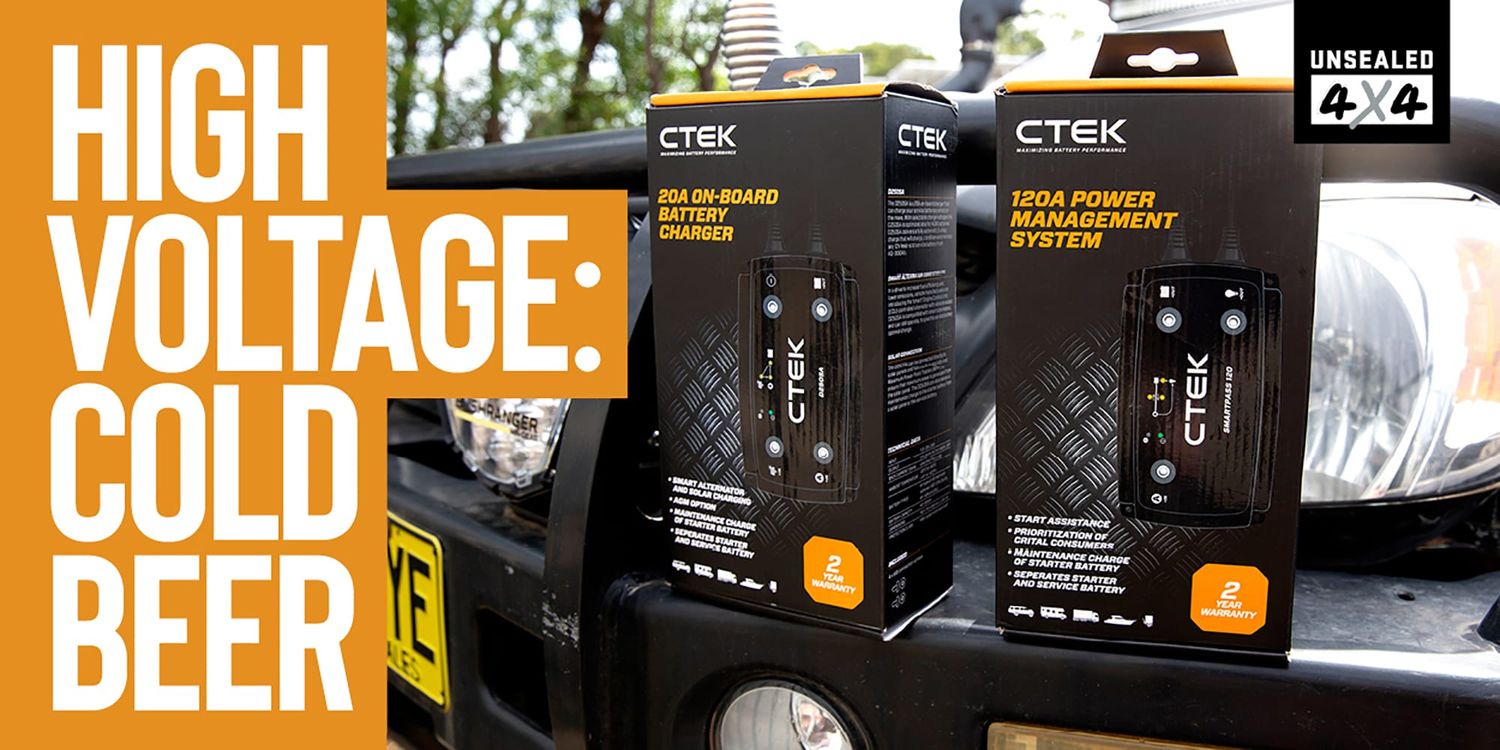
The game has changed when it comes to auxiliary battery charging and 4WDs; no longer is a simple isolator switch going to cut the mustard. And I don’t say that to sound like a gear snob – modern smart alternators simply can’t handle the demands of 4WDers and aftermarket charging systems without a bit of help. This is where modern battery charging systems have come into play, taking signal from the alternator and providing a steady boosted charge rate of sweet, sweet 12V goodness. This package from CTEK is a little different however, as it is made up of two units that, when combined, claim to have the ability to charge up to 140 amps, meaning, well … you do the maths there, but much faster charging of your batteries.
SPECS Input: 11.5-23V, 25A Output:14.4/14.7V, 20A max Ambient temperature: -20˚C to +50˚C (-4°F to +122°F) Battery types: All types of lead-acid batteries, 12V, WET, MF, Ca/Ca, AGM, EFB, GEL Battery capacity: 40–800Ah Warranty: Two years Insulation class: IP65 Price: $1299

WHAT’S THE GO?
The 140A Off-Road Charging System is made up of the D250SA, which is a 20A charger, as well as the Smartpass 120. When combined, these smart chargers (no pun intended … okay, all the puns) offer up to 140 amps of charge to your batteries. The D250SA is a DC to DC charging unit offers a five-stage charging process including battery rejuvenation cycle to keep your investment in tip-top condition. It also accepts charge from solar, wind power or from your vehicle’s alternator. The Smartpass is the brawn of this outfit, taking charge from the alternator and boosting it to a claimed 120 amps. This system will prioritise charging, so you always know the battery that needs love is getting it. Connecting them is easy, just use the supplied connecting straps, which make for a neat and simple installation.

HARD TO INSTALL?
The hardest part of the installation, is finding somewhere to physically fit the units. They need to be mounted as close to the auxiliary battery as possible, and if you want it to work well, away from heat sources. For me, that was quite easy, as I had plenty of space under my fridge slide, and my aux battery is mounted in a toolbox on the side of my HiLux. If you know how to wire a stereo this will prove no issue. If in doubt though, I’d 100% recommend consulting an auto-electrician as this is one job you want done right the first time. A handy wiring chart is supplied in the kit, which highlights what grade of wiring you will need to handle the large amount of juice flowing; I went to my local auto-parts store and asked for 5m of cable with all the copper basically (thick as I could find and practically fit). Voltage drop is not a friend of 4WDers, so spend a bit more and get the right cabling for your application.
One trick worth mentioning is the terminals need to be tightened with an Allen key. And I mean tightened. Finger-tight is not good enough, so when installing make sure you don’t forget to tighten each connection. Otherwise, it’s basically a case of joining the dots. One wire from the start battery, one to the aux battery and an earth the unit/aux battery. Securing the CTEK gear is easy; there are four holes in both the Smartpass and D250SA which I used to put some screws into a piece of wood under my fridge slide. Not the prettiest solution, but practical and sturdy.

DOES IT WORK?
Yep, really well so far. According to the supplied voltage gauge, when the engine is on, the aux battery is receiving 14.4V. There is the ability to wire in an ignition source, which will trick the unit into producing 14.7V. I’ll look into that soon. The supplied voltage gauge was harder to install than most units, as there was additional componentry required (a shunt) rather than a just a feed from each battery. But then again, the information supplied is very handy, so the extra install time is worth the hassle. Having said that, I’ll be looking into a wireless unit soon (which are available), so I can monitor everything from my phone. Another item I’ll look into, is a 240V battery charger so I can connect the whole system to 240V. While I’m not anticipating it will see much use with the solar panels, it’s nice to know the batteries will always be fully charged before a trip or when mains power is available.

WHAT ABOUT SOLAR?
Easy, there is a dedicated built-in MPPT solar regulator in the S250SA, meaning there is no need for an external regulator. Simply run the cables from your solar panel (fuse the positive naturally) directly to it, in fact, using an external regulator is not recommended and will reduce the amount of solar charge being inputted. I have two 80W flexible panels on my roof all the time, so it’s nice to know my battery system is getting charge when parked up. Best of all, it requires no effort from my part at all – this unit does the thinking.

TIPS FROM THE MANUFACTURER As this is a high-tech bit of kit, I wanted to reach out to the manufacturer for install advice and tips for the best results. I was very impressed with the detailed response I received, and thought I’d summarise it for anyone looking to install a similar 12V system.
- Install the unit as close to the auxiliary battery as possible.
- Use good quality cabling and ensure the cabling is protected to prevent any rubbing or short circuiting.
- A solid earth connection is important – negative should be connected to ground (vehicles chassis for example) and not the battery to prevent risk of injury from oxy-hydrogen gas and a potential spark when connecting a charger.
- Tight connections are mandatory – in the case of this CTEK unit, an Allen key needs to be used. Finger-tight is not even close to tight enough.
- Battery selection is important too – ensure your charger is compatible with the battery type you have or are about to select to prevent premature damage.
For more information, click here.