


I’d been tempted to get some under vehicle protection for the Everest for a while now. In fact, I did get a set of Under Vehicle Armour (UVA) from the guys at SmartBar. Yep, the South Australians that make those bullbars that are made of very tough and flexible polymer. And I had it sitting in the shed for a long time, simply because with the custom setup I had with the Dual Battery being underneath the vehicle, I needed to do some modifications to the mounting tray for the battery to allow the UVA to fit because both were using the same mounting points.
When I recently fitted a long-range tank, I had to re-locate the battery into the vehicle, given that the tank used the space where I’d mounted the battery. This was the perfect opportunity to install it to the vehicle.
Unfortunately straight after that, COVID lockdowns squashed plans for a brilliant outback trip that would have tested the product beautifully. Instead, it sat at home until recently when it was confirmed that you could travel within your own LGA for exercise or recreation (and luckily for me, the Watagans is in my LGA).

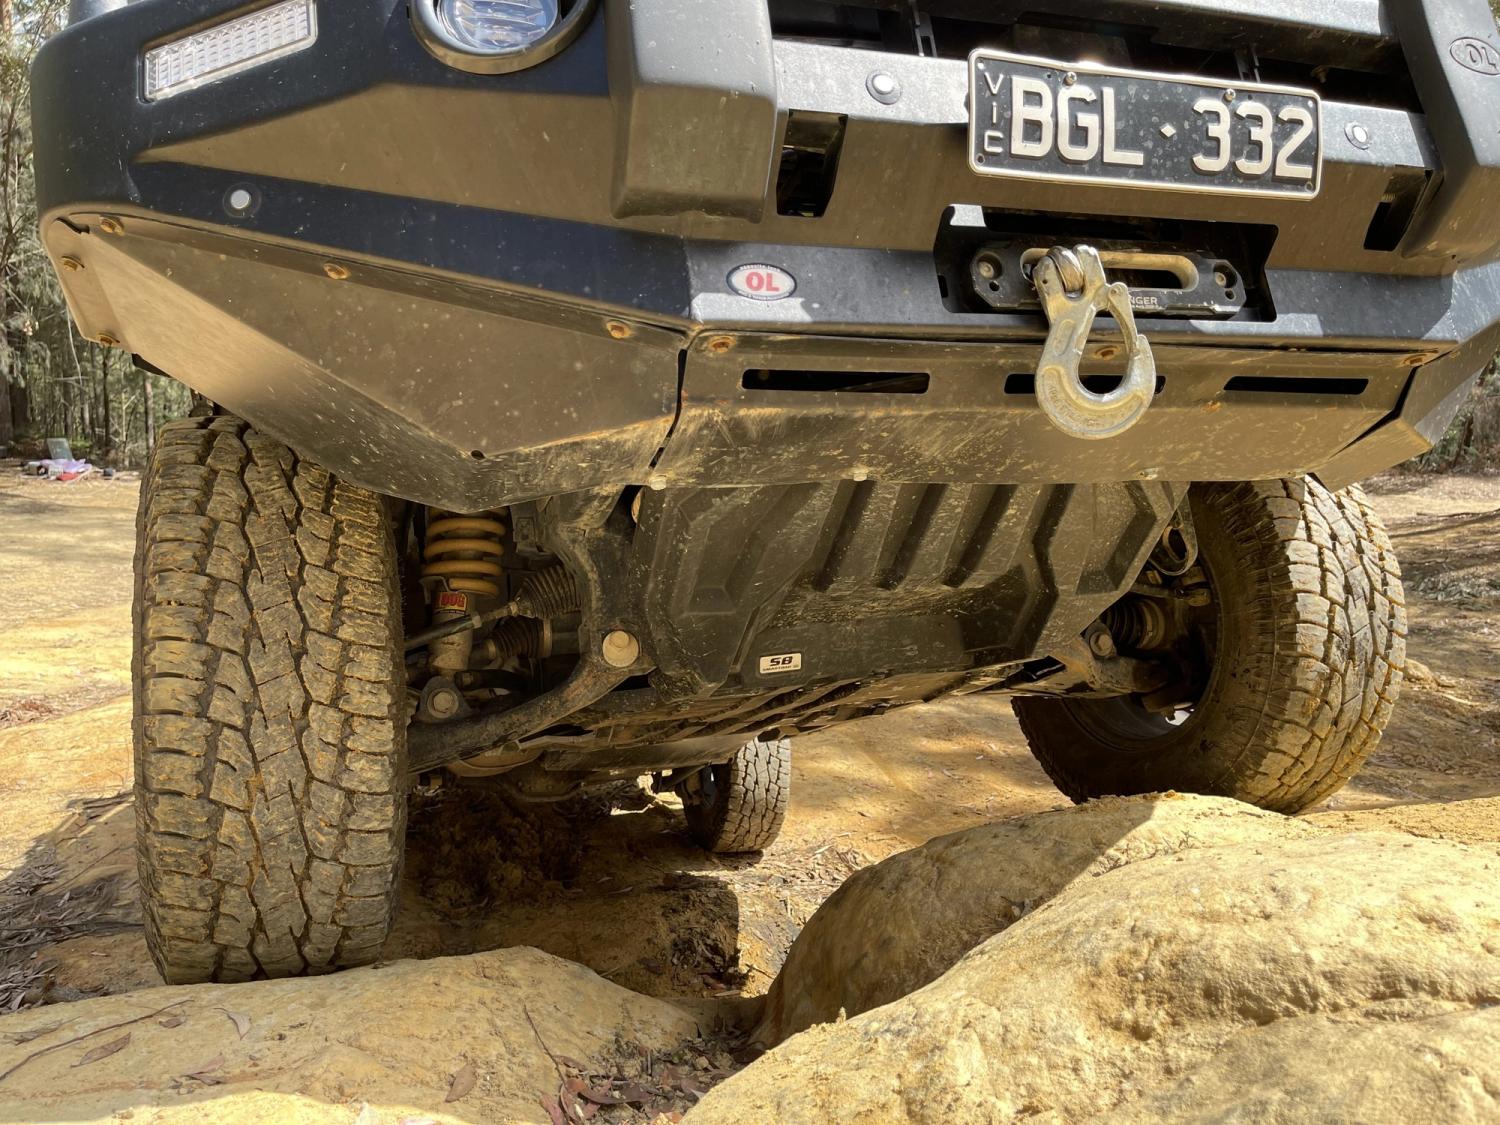
Wish the Everest had this much clearance! You can see the UVA make way to the Long Range tank from this angle.
Why would you consider UVA?
The idea of plastic protecting your vehicle rather than alloy or steel isn’t that appealing for most people. I mean, we think metal is stronger than plastic right? I used to think that too, until I looked into it a bit more. It turns out that the polymer option can be similar in strength to the traditional alloy plate, but it is more flexible, meaning that if it gets hit, rather than denting and deforming, it flexes and can then pop back into shape. If you want an example of this, look up the video of the ARB Frontier fuel tanks which are made of the same crosslink polymer material to see it get run over by a tank and still pop back into shape.
Those that are sceptical of the plastic options’ increased flexibility will worry that it will allow impacts that damage sensitive components under the vehicle. The clever thing SmartBar has done here is utilised a thick (approx. 10-12mm plate) deep rib structure that adds protection where it is needed, and flexibility too.

The UVA is made from a strong and thick polymer, and where the plates join is supplemented by reinforced sections to ensure there is protection. The kit is also very extensive and offers great coverage under the vehicle
The big benefit I saw with UVA was the weight saving. Even with over 700KG of payload, our Everest currently weighs over 2800KG without the driver when the Fridge, tools, and recovery gear is loaded. With a 3100KG GVM, that is cutting it close when the family is added, and I need to have the vehicle completely empty to have enough payload spare to tow the Camper Trailer.
Under Vehicle Armour weighs less than half of the equivalent Alloy product, meaning I get a decent weight saving, the value of which can’t be underestimated when weight is an issue for the majority of 4X4’s on the road.
Taking it for a spin
Given a long distance off-road trip was off the cards, I decided to head out to the Watagan State Forest near my home and tackle some tracks which would test the underbody protection. I’m not really sure what I was thinking when I headed out – I’d usually take a mate or someone else for safety but given COVID this didn’t seem like the right thing to do, so I loaded some extra recovery gear and headed off.
I wanted to try a track that was at least a medium difficulty, but ideally a loop track. I did a bit of online research first and saw a full range of tracks, although in reality it is hard to really know whether the grading is correct until you get there.
I found a loop track and until I drove it, I didn’t realise what I was in for! I happened to choose a track that can be quite challenging to drive, especially when you are alone and have a vehicle that is only sporting a 2” lift.
Following the track, it was initially like any other you’d expect in the area – a few small ruts here and there, followed by puddles full of water, which then gave way to longer stretched of water. Knowing I was alone, I took extra care, stopping to check the depth and base of each section of water to make sure I wasn’t likely to get stuck.


There were some mud holes to cross, although being alone I was careful to check the depth before I went through to ensure I avoided embarassing myself by getting stuck
There were a few times where the under vehicle armour came into contact with the centre line of the puddle, wearing down the top layer of the mud as I drove, but the ruts were not deep enough to really put the full weight of the car on the underbody protection.

The UVA after one of the mud holes. It just caught on one of the steeper exits.
As I went on, the track got narrower (likely given less use during COVID), which made me extra glad our vehicles are wrapped.
Further down the track, I got my first chance to test out the vehicle armour at a fallen tree. These days this obstacle isn’t too bad, although despite thinking carefully about the approach, I did get stuck due to a lack of ground clearance, effectively sitting the Everest on its belly. I tried packing rocks and even recovery tracks to help drive the car forward, but it wasn’t successful.
Luckily the Everest has a Bushranger Revo Winch, which did the job beautifully, getting me across the obstacle.

Bottomed out trying to get over this obstacle. I tried building up to get some traction, but it was too little too late. Luckily I had the winch! (Note: I did use a dampener, it was simply out of shot given that I had to unspool quite a bit of cable to be able to get to an appropriate anchor point)
With the TRED recovery tracks now in the back of the Everest in case they were needed again, I continued on, enjoying the track until I approached the bottom of the climb back up, which had some decent rock steps, big ruts, and off-camber driving heading up the hill.
Off to the side was a secondary track, which I originally assumed was the main track until I got about 100m down to see it was simply a turnaround point. Being alone, I wasn’t sure the risk of damaging the vehicle was worth tackling the first Rock step, especially without a spotter, so I spent a few minutes determining my next course of action.

Photos never to it justice, but that was a decent rock shelf at the start! And a fun drive after that…
I did see that I could skirt around the first step by taking a narrow track up to the right before it rejoined the rest of the climb, which still had plenty of challenging bits to it. I decided to give that a go, and set about dropping tyre pressures to ensure I had the best chance at tackling the climb I was about to attempt.
I maneouvered the Everest around the first big step, and then rejoined the track. The next section was fairly steep, with deep ruts on either side. In essence it looked like there were two key lines people took here. Luckily for me, the centre lines of each created raised sections which suited the wheel track of the Everest. I decided this was the right approach, and inched towards the section, getting out to double check things wherever I couldn’t see or was uncomfortable. The risk I was taking here was that if I didn’t straddle these high sections perfectly, the vehicle would drop into some very deep ruts, and I risked panel damage.
I put the Everest in Rock crawl mode making the traction control most sensitive and also activated the rear diff lock. I then gently crawled up the section, until traction became an issue. At that point, I got out again to ensure I was comfortable with the wheel placement, and check on the position of the vehicle. All looked OK, so I simply reversed a little and then drove a bit harder in an attempt to use momentum to get over the section. I managed to get up and over the section, but as I crested the top of it, the vehicle bottomed out, and sat on its belly again.
Being alone and not keen to risk dropping into one of the ruts, I decided to winch and a few minutes later I was on my way again.
The next part of the track had a reasonably steep climb and then more rock steps, which although probably about 40cm tall were at a position where the vehicle would hit both wheels at the same time. There were plenty of rubber marks showing that this wasn’t going to be easy.
*I wish I took photos, but I was too focused on making sure I didn’t get stuck*
Now well committed, I decided that I would hug the right side of the track, which had a very decent rut on it, and then try to turn the vehicle into the rock step at the last minute to reduce the risk of scraping on the step, and also try to pop a tyre up there.
Before I got up to the step, the Everest found the rut, and I needed to trust the car as the front left wheel lifted high in the air as the rear right of the vehicle hit the rut. I continued to push forward and the wheel came back down just as I was turning into the rock face, which definitely helped as I got the front left wheel up without any real drama.
I turned hard left to steer the vehicle into the obstacle, and at this point the wheels started spinning. Initially I reversed slightly being careful that I didn’t drop the wheel back down, and then I had a go again, this time with slightly more right foot.

There were some decent ruts on the way up!
The Everest lost traction again and spun, but this time I left the wheels to spin about a second or two longer than last time, and then the traction control system kicked in. Next thing, the Everest was moving forward again, inching up the step. Once I got the second wheel up, I accelerated slightly and the back popped up without any drama.
From here it was driving through ruts and ensuring that I was careful not to touch the steep wall on the right hand side.

Driving carefully to make sure I didn’t drop into a rut and do any panel damage
At the next junction, I had the choice to either continue driving the rutted track, or take a chicken track around. After feeling lucky to have fared as well as I did solo, I didn’t really feel like pushing it further, so I took a note to come back and give it a go when I’ve got someone to help spot me and/or recover me if I get stuck.
Verdict

only very minor scratch marks on the UVA, despite winching twice on them.

no major marks here
Despite dragging the full weight of a 2800 KG+ vehicle on the Under Vehicle Armour twice, which included winching, the Under Vehicle Armour only had very minor marks and minimal scratches, demonstrating that it is indeed tough and durable. As someone who enjoys off-road touring, and understands the importance of keeping weight low, I can say that this set of Under Vehicle Armour is definitely tough enough for harder and more difficult 4WDing, especially if you are not an ‘if in doubt power out’ kind of 4WDer (and if you are you’ll probably damage your 4X4 regardless). I’ll be keeping this on the Everest and we’ll check in again in after further trips to give an update on how it fares with more off-road use.
The guys at Smartbar are busy working on new products for other makes and models, and the gear is also compatible with ARB and Smartbar bullbars and recovery points. The other great thing is that it will never corrode, meaning that with a little bit of the right polish, it will never be hard to have it looking at its best.

I can’t say the Long Range Tank handled the situation quite as well (although the manufacturer does say they are strong enough to not need additional protection)
Cost
The Smartbar UVA is prices at about $1,000.00 for the set, which makes it similar in cost to traditional alloy protection, if not slightly cheaper.
What vehicles is it available for?
UVA is currently available for the Ford Ranger, Ford Everest, and BT-50 (except the current model). Work is underway to expand the offering to other vehicles.
For more information, visit https://smartbar.com.au/uva/