


Our Ford Everest build has been coming along in leaps and bounds. We recently added the fridge, driving lights, bulbar, and even a winch (we’ll review that soon). So the next stage in the build was naturally going to be the suspension setup.
Doing the research on what suspension to put underneath the Everest was not easy. All the big 4X4 manufacturers offer suspension kits, and there are also specialist brands on the market, but to be perfectly honest it is very difficult to find any really decent reviews of a suspension setup for a number of reasons, largely likely due to the time and cost involved on changing the suspension out multiple times on a vehicle and then developing scientific testing for each kit.
The most recent proper head to head comparison we could find was quite old – 2011 to be specific, and it had Tough Dog listed as the best overall suspension from that specific test. The truth though is that it really depends on your vehicle as to what will best suit, and also how you will carry your load.
We decided in the end to run with Tough Dog suspension for the Everest. And there were a few reasons they got the tick. Firstly, they are an Aussie owned business, and secondly, they’ve focused purely on developing suspension for off-road applications and have over 35 years experience.

The Tough Dog Kit we installed on the Everest
The other great thing was that Tough Dog sells their suspension as a complete kit, making it easy to get hold of everything required for the upgrade, but this also means that everything is designed to work together too.
We also opted to get the upper control arms upgraded as well, after I’d learnt a bit more about exactly what that does to the setup.

Upper Control Arms too!
I was lucky enough to get permission to have the process filmed, and in the future we’ll release some step by step info on the install process itself. For now though, I’ll talk through the process.
The thing that impressed me with talking to the team at Tough Dog was that they didn’t just offer me a suspension kit. They asked a lot of questions about the vehicle – how was I going to use it? What accessories did it have, and were any further ones planned? How often would I tow? The purpose of these questions was to identify the weight distribution and the constant load that the vehicle would have. The benefit – a suspension kit that was tailored to my specific needs, and optimized for the setup and load on the Everest.
Anyway, I walked into the workshop, and the guys immediately got to work. They were very efficient in getting the old suspension out, and with all of the lines and sensors in modern vehicles, this isn’t that easy.

Taking measurements before installing the new suspension
Before work stared, the team measured the height of the vehicle to the bottom of the wheel arch at its highest point, above all four wheels of the vehicle. The results were as follows:
- Front left 770mm
- Front Right 780mm
- Rear left 780mm
- Rear right 790mm
As you can see, the vehicle wasn’t quite balanced, with the front left of the vehicle slightly lower, and rear right slightly higher in measurement.

Starting with the front suspension

working to remove the front shocks and springs

New springs and shocks installed on the front

unpacking shocks and springs – these come together…

Removing the factory shocks/springs on the front left

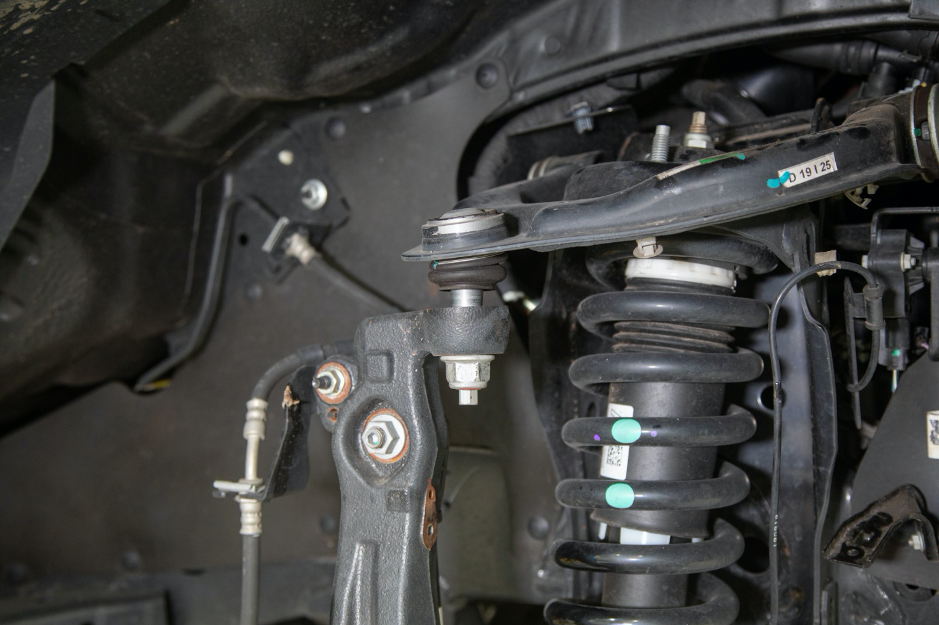
removal of the factory Upper Control Arm

Replacing with the new Upper Control Arm

Taking measurements on the Everest after the suspension change
The guys set to work on the install, and I took the opportunity to pick the brain of David Cook, the head of Sales and Marketing about suspension. I asked him about things to consider before you buy a suspension kit, how to identify when you need to make changes to your suspension setup, how to get the setup right for competing demands (e.g – midweek work use vs weekend trips away/towing), how to tell when your suspension needs replacing, and even what you need to do before you even start thinking about suspension. Dave was very candid, and he gave some great honest answers which I appreciated. You can check out the video below…
If you want to attempt this yourself
- Measurements are the key – before and after without fail!
- It is recommended you have a hoist to aid the process
- We’d recommend taking photos as you go so you can remember the process
- Be careful of the multiple sensors and hoses in the vicinity of the suspension – you don’t want to damage these!
- Don’t forget to do a wheel alignment after the install, and consider upper control arms on an IFS vehicle
All done

Before suspension install

After the install

Before – with a Can of Coke for reference

After – with the can of Coke for reference
Once the setup was done, the guys again measured the results:
- Front left 825mm
- Front Right 830mm
- Rear left 825mm
- Rear right 830mm
Bear in mind that this is without a person in there, so the right side is set a touch higher to manage the weight with a driver.
Overall, we got between a 40 and 55mm increase in height from prior to the suspension upgrade. And with the bullbar and winch on the front, there would have been some sag from the original ride height.
These numbers also include about 30-40Kg of tools, plus a fridge in the rear too. So, with the vehicle constantly carrying about 100KG in the rear, plus bullbar, winch, and driving lights on the front.
Upper control Arms
We decided to get the upper control arms upgraded as part of the process. The reason was simple – we wanted to ensure that the upper control arms and ball joint were returned to their natural position. This had benefits in terms of ensuring that the balljoint was able to operate without running out of articulation during suspension travel, minimising wear and tear on the ball joint itself. The balljoint housing is also altered to reset the resting position at the increased ride height which meant we could be sure we would get a proper and complete wheel alignment and therefore maximise the life of our tyres.
Whether you can get away without replacing the upper control arms or not really depends on the alignment your car can achieve. Ultimately, for a perfect alignment it’t beneficial to have them, leaving more leeway for fine adjustment using the factory adjustment points. Even if you can achieve alignment without them, you’ll be at the limit of the ball joints, which may result in increased wear and tear, and reduced performance off-road.
Following the install, we went and had a wheel alignment done at Tyre Power, given the changes to the suspension setup.

getting a wheel alignment

fine-tuning the adjustments

They’ve got some cool new technology available to assist wheel alignments now!
Our setup
40mm, 9 stage adjustable Shocks.
Bullbar and Winch weighted springs – Front
0-300KG constant load – Rear
Upper Control arms
Cost
Suspension kit – $1,804.00
Upper Control Arms: $585.00
Install: $670.00
Total: $3,059.00
Key Learnings
- Consider replacing upper control arms on IFS vehicles to ensure that the arm sits in a neutral position with the increased height, ensure wheel alignment can be achieved, maximise performance and travel, and reduce wear and tear.
- Do suspension last – have your vehicle setup with the constant load you will tow before doing the suspension to ensure that it is fit for purpose
- Choose a provider that will ask you about your weight setup and match springs etc to your specific vehicle to ensure optimum results
- If your vehicle is not returning to centre after one cycle of the suspension after a bump, or it doesn’t feel right, that is a key indicator that you should have it checked.
- Expect suspension to last about 100,000km, but understand you may need to replace bushes on modern vehicles sooner than that due to the additional force applied through them vs older setups.
- Even if you’ve already done suspension, if you add or remove anything significant (like rooftop tent, drawers, awning etc), then have the provider of your suspension check to see if the current setup still works. Some different springs might make a massive difference to the ride.
- Focus your setup on what you are constantly carrying all the time – not on the maximum you might carry. If you need additional support some of the time, airbags may be able to help adjust performance for these periods, but it is important that the suspension suits what you are doing ‘most’ of the time.

Out on the trails!
Conclusion
Personally, it was the little things that really impressed me with the Tough Dog Install. Things like the fact that the spring rate is slightly different in the rear left vs rear right to account for the Adblue tank. And the questions they asked to ensure they gave us the right kit for the vehicle.
If you’d like more information on Tough Dog Suspension, you can visit www.toughdog.com.au.
And if you’re looking to insure your upgraded 4X4, we’d love to give you a quote!

So good we can get the tyres muddy again